
Spoiler alert: fitting the radiator didn’t exactly go to plan: Fixings were missing from my supplied kit (I am beginning to expect that) and one massive mistake on my part. As a result I hope that this post helps future Caterham 420R S3 builders not make the same mistake I made!
Fitting this radiator currently is not documented in either manual (v1.2 and 2015c), and I think isn’t really understood by Caterham’s parts picking process for 420 kits. By way of an example, my kit included an oil cooler fitting kit and brackets (which are not longer needed with the new combined unit)
UPDATE – The v2.0 manual does cover the new radiator design, but does not show the mounting brackets.

Fixings found 
New design radiator
Considering the lack of information I had for this step, I decided to find all the fixings I thought I needed before starting, and this was where I ran into my first problem. Although the correct length fixing is now supplied with the radiator for the top mount, I didn’t have any M8 bolts short enough for the lower bobbins. I thought I would use a longer bolt as a temporary measure, but in the end didn’t bother.

Spanner that fits 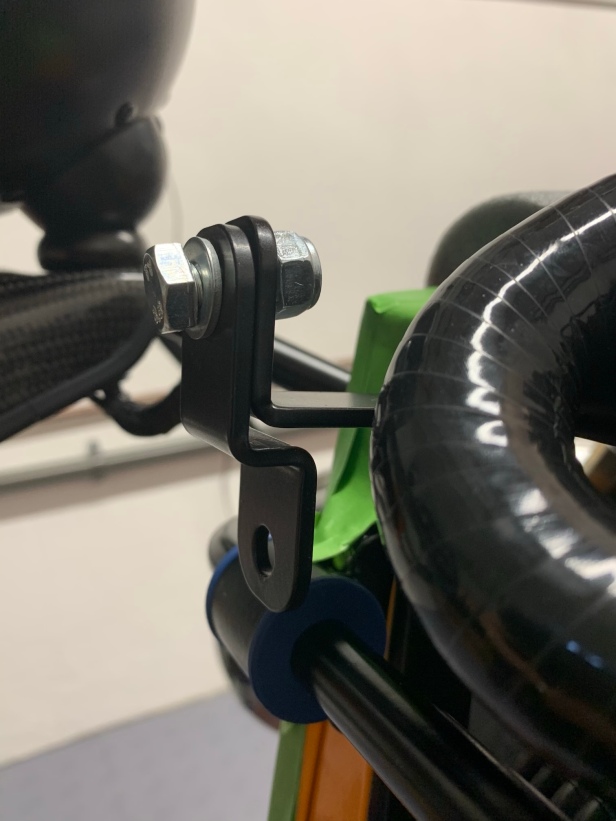
Lowering bracket in place 
Lower bobbin in place
Next, I decided to find a spanner slim enough to fit within the gap between the radiator and the bent bracket. I fitted the drop brackets and the lower bobbins after. Note, I didn’t secure the bobbins with nyloc nuts; nyloc nuts can be a nightmare to remove from a disinterested rubber bobbing. I have only ever seen Caterham use standard nuts with spring (split lock) washers on bobbins.

Headlight Econoseal connections 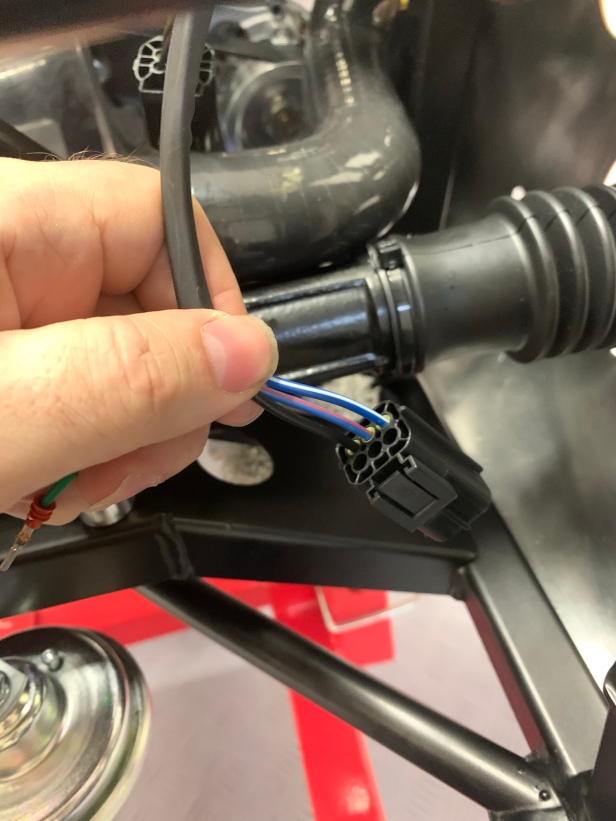
Push the wires until they click 
Tie wrap the headlight wires 
Right-hand-side headlight wiring
I then realised it would be a good time to finish tidying the headlight wiring, by making up the Econoseal connectors and tie wrapping the wires into place. The process is simple, connect the two halves of the connector and match the wire colours. Push the wires into the connector until you hear the click, no click means you haven’t oriented the pin correctly. Finally tie wrap the wires to the chassis tubes. I didn’t go mad, because there is unfinished business here. Until the front wings are fitted and the side repeaters are fitted, I am missing a green wire, so I didn’t fit the yellow locking element into the Econoseal connectors.
I also connected the horns (using the purple and yellow wires).

Bottom hose mid way up the radiator 
Tried dry sump hose under bottom hose but over steering rack 
Dry sump hose above bottom hose 
Only hose route that worked 
Tie wrap dry sump and bottom hose
Now the fun really began. The bottom hose isn’t connected to the radiator in same location as my previous 360R, it’s actually almost 1/2 way up the radiator. This led me to trying different locations for the dry sump hose (top of dry sump tank to right-hand-side of the radiator) and the bottom hose. To rearrange these two hoses I removed the catch tank, which proved to be a) the limiting factor and b) the cause of my mistake.

Wires needed moving to get those extra Millimeters
The only route I found for the dry sump hose and bottom hose was routing the dry sump hose under the steering rack and the bottom hose one top of the steering rack (where I had it to start with). However, every Millimeter is needed, and I had to move cables to get the dry sump hose to fit this tight route.

Measure the hose 
Top hose cut with a junior hacksaw 
Top hose clean cut
So, I proceeded to cut the top hose to length, and decided to use a hacksaw to cut the hose on my marked line. This worked well with a little rubber lubricant.
The photo of the cut hose shows my big mistake: I measured the top hose with the catch tank removed. The result: a hose cut too short!

Problem 
The catch tank in position means the top hose should be longer
So, with no lower fixings present and a top hose cut too short that’s where I had to stop the radiator fitting process for now. (UPDATE below)

Cooling fan fitted 
The wrong nut type has been supplied. Supplied M6 Type P, but need M6 Type T
I decided to try and attach the cooling fan, mainly for protection of the delicate radiator. Normally, the plastic mounts are just a push-fit, but not this time. I had to lubricate and locate them with the aid of a rubber mallet. The final step was to attach the fan to the radiator, and even without any washers there just isn’t sufficient thread through the nyloc, so another frustrating fixings problem to solve.
UPDATE – Please see David’s comments below on heating these plastic mounts, it might save some trouble.

UPDATE – I have now fitted M6 Type T nyloc nuts to the cooling fan and the thread is now clear of the nut. I was advised with my 360R build this would be an IVA fail, so its well worth the effort sourcing the correct nuts.

Lower radiator bolt hole 
Bolt selection 
Bolt with washer 
Lower bobbin 
13mm spanner selection 
Very thin 13mm spanner
UPDATE – I obtained two options for the lower radiator bolt, M8 x 12 and M8 x 10. I wanted to use the longest bolt possible, but unfortunately the M8 x 12 bottoms out in the bobbin before pulling up on the radiator. Therefore M8 x 10 are the bolts to get. Then I stumbled into the next problem, my thinnest 13mm spanner was still to wide to torque the bottom bolt. So I purchase a thinner spanner, a Facom 31 Extra Slim open ended spanner (https://www.facom.com/uk/). With the M8x10 and the very thin spanner the radiator was finally fitted. There will be a separate post on the top hose.

Tools Used
- 13mm slim spanner (Facom 31 Extra Slim)
- 13mm combination spanner
- 13mm 1/4″ drive socket
- 10mm 1/4″ drive socket
- 1/4″ drive ratchet
- Side cutters
- End cutters
- Junior hacksaw

Just a small point on fitting the four plastic mounts for the fan that you attached to the fan with lubricant and a rubber hammer: I found a really smart way of making this easy: heat the four mounts in a pan of hot water – once expanded they slide onto the fan really smoothly! Why this is not mentioned anywhere I do not know!
David Earnshaw
LikeLiked by 1 person
Thanks Dave. Shame I can’t try it out 😦 It’s strange if they were metal I would have instantly thought of trying to freeze / heat them to get them to fit just like the top hats, but because they are plastic, the thought never crossed my mind. I have put an update in the post to read your comment.
LikeLike
By the way, fantastic blog! Keep it up – wish I had done my 420S in 2020 so as to follow yours! Finished mine in September 2019.
LikeLiked by 1 person
There are one or two point to note with fitting the 420 R radiator as currently supplied (December 2021).
The bottom hose has to be cut and joined to a second right angled piece using an aluminium joiner. This is a workaround to compensate for using an old design hose to meet the outlet on the current radiator. One would hope a single piece bottom hose will be available in due course.
Making the cut in the bottom hose needs care. I did a trial with the bottom hose fitted to the engine and the right-angled piece on the radiator. The cut is needed around the midpoint of the steering rack but I chose not to cut it insitu but instead removed all hoses and made the cut on the bench.
The second issue with the radiator was that the loose bolts for the lower bobbins wouldn’t fit into the slots. This problem is exacerbated by a build up of weld around the tank. Increasing the size of the slots looked risky as it would be very easy to damage the radiator. In the end I filed down one flat of the hex head, this had to be taken down to the threads of the bolt before it would fit. The bolt is also very short and has to be held in a vice for filing. I needed to run an M8 die to clean the threads.
LikeLike
Thanks Nick, I think I will publish the photo you sent me.
LikeLike
One further comment on the radiator. With the current (2021) design of radiator the top outlet is directly above the LH drop down bracket. Having done a final tightening of the radiator fastners I noticed that the underside of the outlet was in metal to metal contact with the dropdown bracket. As far as I can see there is no vertical adjustment for the radiator nor the drop down brackets.
My solution was to remove the radiator and file the top of the dropdown bracket and corresponding chassis mount. I took these down a couple of mm, painted the cut surfaces and reassembled, which gave me a clear air gap between radiator outlet and bracket. Unfortunately this gap is not sufficient to allow the top hose to pass but Caterham had already confirmed to me not to expect the hose to fit properly🤔
LikeLike